In this, my fifth article on the Go programming language, I’m looking at the build and packaging process, and other tooling. I’ll start by looking at how code is structured into packages, and then look at the tools for building, packaging and testing.
This is the 5th of the 6 articles that currently make up the “All Go” series.

In the four preceding articules in this series, I think I’ve covered much of the core runtime semantics of the Go language — not everything, for sure, but enough to read and comprehend a lot of Go code, I feel.
At this point, therefore, it’s probably worth looking at an important aspect of developing software in any language: the tooling.
In this article I’m going to start off by looking at code structure — how is source split across multiple source files, and how are they aggregated into larger modules. This will nicely leave into the build and packaging process, and from there I’ll expand into a brief look at the additional facilities that the tooling offers beyond compilation. Finally, I’ll take a look at the topic of automated testing in Go — how tests are written and organised.
Let’s kick off by looking at how to organise our source code. Here’s a quick diagram of a possible codebase layout which you can refer to as you read this section.

And here’s a corresponding directory layout, although I haven’t made any attempt to follow repository naming conventions here — more on that a little later. This is just to get an idea of how the package structure maps to the physical layout.
myworkspaace/
├── go.work
├── module1/
│   ├── go.mod
│   ├── mypkg1/
│   │   ├── srcA.go
│   │   └── srcB.go
│   └── mypkg2/
│       ├── srcC.go
│       ├── srcD.go
│       ├── srcE.go
│       ├── mypkg4/
│       │   ├── srcF.go
│       │   └── srcG.go
│       └── mypkg5/
│           └── srcH.go
└── module2/
    ├── go.mod
    └── mypkg6/
        └── srcI.go
Every Go source file begins with a package declaration to indicate what package it’s in. A package is the most fundamental unit of source code organisation in Go, and it’s the granularity that you access using import. All the source files within a package should be located within the same directory, and every directory should contain source files from a single package or you’ll get a compilation error.
Generally the directory name is the same as the package, although this isn’t strictly required. The directory name is what you provide to the import statement, but the package name is then used as the namespace for the identifiers in your source code. Your life will be simpler if these coincide.
Packages can be nested in other packages, by including them in subdirectories, although as far as I can tell this is only organisational — I don’t think nested packages have any special access to their parent or child packages, they all need to be imported explicitly.
Speaking of access rules, the identifiers in a package all follow the same convention — those names which begin with an uppercase letter are public and may be used by code outside of the package. All the remaining identifiers that start with lowercase letters are private. This isn’t just a convention, this is enforced by the compiler.
The last thing to say about packages is that package name main is special, and indicates that this code should be built as an executable rather than a library, and that this package contains the main() entrypoint for that executable.
Packages are then organised into modules, with each module comprised of one or more packages. A module is the unit of distribution and versioning, and is defined by the existence of a go.mod file which contains metainformation about the module. The location of the go.mod file defines the module root directory.
To create an empty go.mod file, you can use the go mod init <name> command in the directory in which you’d like to create it. This initially just creates an go.mod which just has the module name and the current version of Go, but we’ll see a little later in the article how to expand this.
As an aside, I’ve seen some indications that some older modules may not have a go.mod file, if they date from an older version of Go where all Go source code was expected to be located under a GOPATH top-level root directory. I’m hoping this is old history and I don’t need to worry about it too much, but I just mention it as something of which it may be worth being aware.
The module path defines the canonical name for the module, and should be globally unique. It’s declared using the module directive in go.mod, which is required and must occur only once. Conventionally the module name starts with a domain owned by the author so as to ensure global uniqueness. There are various rules about module names which you can find out by looking at the modules reference, but these are only really important to get right if you want to distribute your module to a wider audience.
Each module also has a version, although this is not specified directly in the go.mod file — as far as I can tell it’s expected to refer directly to a tag created in the source code repository. For example, if you want to release your current repository in its current state you can git tag v1.16.8 to set that version.
This makes the release process very simple, but it does add a bit of a risk — if someone deletes or moves a version tag it will cause all sorts of havok. There is a central mirror to which you can publish modules, however, and I believe that takes checksums of files so any changes should be detected. We’ll talk more about publishing modules later.
Versions follow the semantic versioning guidelines. So, a version of v1.16.8 has a major version of 1, a minor version of 16 and a patch level of 8. For those not familiar with semantic versioning, there are well defined rules to specify when each part of the version should be changed.
Modules can have pre-release versions which have additional strings appended, such as v1.16.9-beta2 — there are some in-depth conventions about how to format these as well, but that’s a little outside the scope of this article.
The other point to mention is that from the second major version onwards, the module path requires a suffix to record the major version. For example, if I had released a library called andy-pearce.com/go/goodenough and I was ready to released the second major, I’d release it with name andy-pearce.com/go/goodenough/v2
Beyond the module directive, the go.mod file can specify other information about the module, most importantly the other modules on which it depends to build.
gotoolchaingo directive. This is advisory, later toolchains might be used.requirerequire modname v1.2.3, where the version listed is the minimum required. The line might also have //indirect added if nothing in the main package directly uses this module, but it’s still required as an indirect dependency.excluderequire, but excludes a specific version of a module from consideration.replaceretractThere are a number of go mod subcommands which can make these changes to go.mod for you. For example, the go get command, which we’ll look at a little later, not only fetches packages for local building but also adds them to a require directive in go.mod.
There is an additional level of organisation which was added in Go 1.18 which allows multiple modules to be grouped together into a workspace.
It’s important to note that this doesn’t seem to be expected to be a particularly common use-case, and I’ve seen quite a few people suggesting that it’s easier just to keep each module in its own repository and not worry about workspaces. But just for completeness I thought I’d briefly mention them, at least.
A workspace uses a similar file to go.mod except this time it’s go.work. Modules are stored in subdirectories under this, and the go.work file contains a use directive for each module to include.
Just as with go mod init you can use go work init to create a new go.work file, and go work use <module> will add a use directive to the file. It also has a few other directives that can be used but I think a detailed look is outside the scope of this article. The Go documentation contains a workspaces tutorial, and the modules reference is the place to go if you want all the gory details.
For the remainder of this article I’m going to assume that you’re working on a single module at a time.
What we’ve looked at so far are the specifications for what Go will accept in terms of repository structure. However, there are a number of commonly used conventions which have sprung up in the community, and it’s probably worth considering them to make your project more accessible to other developers in the future.
Since these lack authoritative documentation, they’re a little harder to put together, but I’ve done my best to collect what seem to be the common standards here for convenience.
As I said earlier, I’m going to ignore workspaces and assume that this layout is for a single module in its own repository. The go.mod file lives in the root of the repository, along with things like README.md and LICENSE.md. The repo then has the following potential subdirectories.
cmd/internal/internal import any packages under internal.pkg/internal/ or pkg/, but if there are a lot of these it could make things confusing to newcomers to the repository when you combine them with directories that don’t contain Go source code (e.g. docs, examples, scripts, assets).vendor/build/.rpm, .deb. .pkg) go into build/package, whereas CI files (e.g. Travis, Circle) go in /build/ci if possible.test/test/ directory is for any external test applications or static data thats to be used by tests.docs/README.md).examples/configs/api/init/scripts/Makefile should reside here.assets/web/As a final observation, you’ll note that there explicitly is not a src/ directory — source code is located directly in cmd/, pkg/ and internal/ plus other directories as required.
Now we know how to create our repository, let’s take a quick look at writing tests for our code. In this section I’m just going to look at writing tests — I’ll look at how to run them a little later in the Tooling section. I’m also going to briefly mention a few third party libraries to help with testing, and also look at writing benchmarks.
Let’s say we’ve written a simple module to calculate the nth Fibonacci number. Here’s the code below.
| fibonacci.go | |
|---|---|
1 2 3 4 5 6 7 8 9 10 11 12 13 14 15 16 17 18 19 20 21 22 | |
Now we need to write some unit tests. To do this I’m going to look at the builtin testing module, is quite basic — there are third party libraries which add more testing facilities if you want them.
Tests in Go are typically located adjacent to the code they test, in a file with the suffix _test.go. They can be part of the same package, in which case they have access to all internal and external symbols within the package — or they can be in a separate package, in which case they need to import the package under test and will only have access to external symbols. Any function in a file with the correct suffix, and where the name of the function starts with the prefix Test is considered a test case to be run.
In this case I’m going to create a file fibonacci_test.go and I’m going to colocate the tests in the same package. We’ll start by validating that the initial two values of sequence, the base cases of the recursion, are correct.
| fibonacci_test.go | |
|---|---|
1 2 3 4 5 6 7 8 9 10 11 12 13 | |
You can see here that testing doesn’t offer any assert-style functions for us to use — we have to validate the results using normal code, and then just call a function in testing if the test has failed. A test which didn’t fail (or panic) is assumed to have passed.
Now let’s do a spot check on, say, the 10th value.
15 16 17 18 19 20 | |
And let’s test the 80th value, which is fairly close to the limit of what a uint64 can hold. In this test we’ll also make sure the test doesn’t take too long to run, so we can make sure our function isn’t suffering from the combinatorial explosion which would occur if we’re not using memoisation.
22 23 24 25 26 27 28 29 30 31 32 | |
Finally, since we’ve chosen to make 0 an invalid value instead of defining F(0) == 0 as is more normal, let’s just check that the function panics as expected when run in that way.
34 35 36 37 38 39 40 41 | |
From this brief look we can see that Go’s unit testing facilities are functional but rather basic. If you want more advanced facilities, you either have to build them yourself or go looking for third party modules to provide them. A good example is mocking, where you either need to restructure your code to allow explicit dependency injection, or you need some additional facilities to do this implicitly.
I’m not going to drill into the details because these aren’t core features, but as a quick guide here are some third party modules that add additional testing features you might like to consider.
AssertExpectationsWereMet() method which you can check as part of your other test assertions.testing module. This module includes an assert package with rich assertion functions, a mock package for mocking that supports setting and validating function call expectations, and a suite package that allows tests to be structured into suites with shared “setup” and “teardown” methods. From a very brief examination, it looks to me like Gomock has a richer API for setting expectations on mocks, but Testify offers a lot of useful functions beyond just mocking. Nothing to stop you using both, of course, but I’m always wary of piling too many overlapping frameworks into a project — over time developers have a tendency to use them all and you can end up with inconsistent approaches across your code base.testing/quick in the standard library which performs a simpler version of this, but Gopter offers more control over how the arbitrary inputs to functions are generated, and the key feature of “shrinkers” to reduce a failing case to a minimal reproduction case — in my opinion this latter feature is an important part of making generative testing more useful, but it’s a personal opinion.There’s an additional facility that was added in Go 1.18 to perform fuzz testing. This involves running tests against somewhat randomised data to check that your code tolerates them without crashing or behaving incorrectly, to guard against simple exploits and denial-of-service attacks.
The basic approach is to provide some initial seed values which give the test a sample of the kinds of values against which your code will be called. It then attempts to “mutate” these values to try to find cases which break the code. This requires support for the types in question, so only the following types are supported at present:
string and []byteint, int8, int32 (and rune), int64uint, uint8 (and byte), uint32, uint64float32, float64boolTo write a fuzz test, you need to provide seed values with the Add() method of the testing.F object that you’re passed, and then you call Fuzz() passing a function which takes a testing.T as we saw earlier and a single parameter which is of the type we’re fuzzing.
The function that’s passed should confirm the behaviour of the code is correct under that input — it will be called repeatedly on whatever values the mutator produces.
43 44 45 46 47 48 49 50 51 52 53 54 55 56 57 58 59 60 61 62 63 64 | |
We’ll see an example of running this below in the Tooling section.
The other thing that can go into your *_test.go file are benchmarks. These are distinguished by their names starting Benchmark instead of Test.
Instead of a testing.T pointer, these functions get a testing.B pointer1. This defines a member N which specifies how many times your benchmark should run — this means that pretty much every Go benchmark function has an outer loop in it.
Let’s add some benchmarks for different inputs to our existing test file.
66 67 68 69 70 71 72 73 74 75 76 77 78 79 80 | |
As with the tests above, I’ll talk about how we run these tests in the Tooling section below. However, it’s important to note that the number of iterations is under the control of the testing framework, and your benchmark will be invoked various times with different number of iterations until the time per iteration seems stable.
This means it’s very important for the runtime of your benchmark to be repeatable — if you use a random input every time, or similar unpredictable variation, then your benchmark will never stabilise and thus never terminate. If you want to vary your input, or other factors, then control this by having multiple benchmarks where the value is consistent within each one, as in the example above.
Now we’ve looked at source code organisation and facilities for testing, let’s take a look at how we can build, test and package it. I’ve split this section into subsections based on stages of the software lifecycle:
Acknowledgment: In putting this section together, I found Alex Edwards’ article An Overview of Go Tooling very helpful, and you’ll probably notice that I essentially adopted his article’s structure for this section, as I thought it was an excellent way to lay things out. I find it useful to rephrase things in my own words, which is why I still wrote this, and I hope I’ve covered things differently enough that there’s still value in reading both. You may, of course, disagree and it’s certainly not my intention to claim credit for someone else’s work, or discourage anyone from reading Alex’s excellent article, hence this acknowledgement for full transparency.
I’ve already mentioned go mod init to create a fresh go.mod file in the current directory, and there isn’t a great deal else to say about it except that the module name is optional, and if you omit it then it tries to figure out what it should be from various other clues.
A command you’ll use a lot is go run, which is a convenience to build an executable in a temporary location and run it. You need to supply a directory containing the main package that you want to run, so in simple examples with a single executable it’s often go run .. You can specify build flags before the package name, and command-line arguments after it.
One thing that’s worth mentioning at this point is that performing any build, including via go run ., will automatically fetch any requirements listed in go.mod. These are stored in global (to a user) cache — you can find where yours is and running go env and looking for the GOMODCACHE entry. Note that this is different from GOCACHE, which is where recently built artifacts are stored to accelerate later builds.
If you want to quickly check something in the docs, and it’s a pain to use a web browser, you can view simplified documentation in the terminal using go doc followed by something to search for. For example, go doc fmt shows simplified documentation for the fmt package, and you can specify go doc -all fmt for the full documentation.
More usefully, you can also filter it down to a specific function or type, such as go doc fmt.Printf.
So you’ve written some code and you know how to run it — the next thing you’ll probably want to do is use some third party modules. The easiest way to do this is something like go get github.com/spf13/cobra. This will add a require directive to go.mod for the specified module, as well as downloading it into the module cache ready for the next build.
This can sometimes add //indirect dependencies to go.mod and there are various commands to investigate why dependencies have been added — I’m not going to go through them in detail, but here are a few useful ones:
go mod why <module>go list -m allgo mod graphAs an aside, if you need to clean the module cache you can do so with go clean -modcache, and go clean -cache cleans the build cache.
The gofmt tool is the opinionated code reformatting tool which can reformat your source files, similar to clang-format for C/C++, black for Python and rustfmt for Rust.
However, as well as performing cosmetic reformatting, it also has some basic refactoring features that are worth being aware of. You can combine the -r option to rename symbols in a language aware fashion, so unlike a standard search and replace accidental occurrences in strings and comments aren’t altered. Take this example code as a starting point.
| foo.go | |
|---|---|
1 2 3 4 5 6 7 8 9 10 11 12 13 14 | |
Now we run gofmt with a -r rewrite rule, along with -d to show a diff and -w to update the file in place.
$ gofmt -d -w -r "foo -> bar" foo.go
diff foo.go.orig foo.go
--- foo.go.orig
+++ foo.go
@@ -3,13 +3,13 @@
 import "fmt"

 func myFunc() int {
-   var foo = 123
-   fmt.Printf("Value of foo is %v\n", foo)
-        // Now we return the value of foo
-   return foo
+   var bar = 123
+   fmt.Printf("Value of foo is %v\n", bar)
+   // Now we return the value of foo
+   return bar
 }

 func main() {
-   foo := myFunc()
-   fmt.Printf("Got return value %v\n", foo)
+   bar := myFunc()
+   fmt.Printf("Got return value %v\n", bar)
 }
The resultant file has had the symbol occurrences of foo replaced with bar, but the cases in strings and comments are left untouched.
| foo.go | |
|---|---|
1 2 3 4 5 6 7 8 9 10 11 12 13 14 15 | |
More usefully, it can also perform simple pattern matching — anywhere you use a single lowercase letter, that will match any name and be substituted as appropriate. For example, if you had a call to myFunc(123, xyx, 100) and you used the rule myFunc(a, b, 100) -> myNewFunc(a, b) then it would be transformed to myNewFunc(123, xyx).
As well as -r there’s also a -s option which tries to apply a series of pre-defined simplifications — these are typically a handful of idiomatic cases, such as replacing x[i:len(x)] with x[i:].
The Go runtime includes an optional data race detector — this aims to detect cases where two threads of execution are both accessing a value, and at least one of them is a write operation. Concurrent reads are always safe since the value isn’t changing, so both threads will read the same value regardless of the order in which they do so.
To enable this you can supply -race to go run, go build and go test. Enabling the race detector adds overhead, so it’s probably not a good idea in production code, but during testing it could help track down some tricky errors. The memory usage is likely to be around 5-10X normal and the execution time will be 2-20X longer.
Consider the following code.
1 2 3 4 5 6 7 8 9 10 11 12 13 14 15 16 17 18 19 20 21 22 23 24 25 26 27 28 29 30 | |
This is quite aggressively prone to data races, so should be an easy one for the race detector to pick up on — and it doesn’t disappoint us.
$ go run -race .
==================
WARNING: DATA RACE
Read at 0x00c00001e118 by goroutine 7:
  main.main.func2()
      /Users/andy/src/code-playground/go/basic-learning/race/race.go:24 +0x3d

Previous write at 0x00c00001e118 by goroutine 6:
  main.main.func1()
      /Users/andy/src/code-playground/go/basic-learning/race/race.go:18 +0x4b

Goroutine 7 (running) created at:
  main.main()
      /Users/andy/src/code-playground/go/basic-learning/race/race.go:22 +0x116

Goroutine 6 (running) created at:
  main.main()
      /Users/andy/src/code-playground/go/basic-learning/race/race.go:16 +0xae
==================
21076
Found 1 data race(s)
exit status 66
If you want more details, you can check out the official documentation.
To run the tests that we saw earlier, you simply run go test and supply a directory — you can run all tests in the current directory with go test . and include tests in all subdirectories with go test ./....
I’m not going to mention go test -race because we just looked at that above with go run — the principle is exactly the same. Just a reminder that it’s a good option to set unless you have an awful lot of tests and you really need to them to complete very quickly.
So let’s look what else we should know about go test.
Test results are cached, which is useful to speed up testing a large repository. To make this clear, Go will print (cached) next to any cached result which is printed. One slightly unfortunate side-effect of using a cached result is that the time taken to run the test isn’t printed (since it wasn’t actually run).
The cache is invalidated on any change to the package on which the tests are defined since the last time tests were run. Also, you can clear out all cached results with go clean -testcache.
Another way to force test to bypass the cache is to specify -count 1, although this is a bit of a side-effect — the real purpose of this option is to run tests (or benchmarks) multiple times.
This can be useful when trying to reproduce those irritating intermittent faults that don’t crop up on every test run.
If you only want to run tests matching a certain naming pattern, then the -run option is for you. You supply a regular expression, and only test names matching that expression are run.
❯ go test -v -run='thValue$'
=== RUN   Test10thValue
--- PASS: Test10thValue (0.00s)
=== RUN   Test80thValue
--- PASS: Test80thValue (0.00s)
PASS
ok      fibonacci   0.170s
The -v here just makes the output more verbose, listing the individual tests which were run and their results, rather than just a summary of how many tests were run.
You can also specify -short to skip long-running tests, although as far as I can tell all this does is make the testing.Short() method return true in the tests, so you need to write your slow tests to skip themselves if that’s set.
There’s also -failfast which will skip running any more tests after the first failure, and go test all which will include all tests from dependencies as well as your code. As you might imagine, go test all can take quite some time to run, since as well as your module’s third party dependencies, you’re probably going to be testing quite a lot of the standard library too, so definitely something to align with when you want to go and get yourself another cup of tea.
To run Fuzz tests, you just add -fuzz to your go test command-line. There’s also a paramter -fuzztime which is used to specify the length of time for which to run the tests if no failures are found — by default the tests run indefinitely until you cancel them.
Let’s see an example using the FuzzFib() test case that we saw earlier in the Writing Fuzz Tests section.
$ go test -fuzztime=30s -fuzz=.
fuzz: elapsed: 0s, gathering baseline coverage: 0/13 completed
fuzz: elapsed: 0s, gathering baseline coverage: 13/13 completed, now fuzzing with 12 workers
fuzz: elapsed: 3s, execs: 222805 (74258/sec), new interesting: 1 (total: 14)
fuzz: elapsed: 6s, execs: 471086 (82771/sec), new interesting: 1 (total: 14)
fuzz: elapsed: 9s, execs: 716581 (81826/sec), new interesting: 1 (total: 14)
fuzz: elapsed: 12s, execs: 951560 (78332/sec), new interesting: 1 (total: 14)
fuzz: elapsed: 15s, execs: 1191975 (80134/sec), new interesting: 1 (total: 14)
fuzz: elapsed: 18s, execs: 1393026 (67018/sec), new interesting: 1 (total: 14)
fuzz: elapsed: 21s, execs: 1593956 (66957/sec), new interesting: 1 (total: 14)
fuzz: elapsed: 24s, execs: 1796822 (67643/sec), new interesting: 1 (total: 14)
fuzz: elapsed: 27s, execs: 1996419 (66529/sec), new interesting: 1 (total: 14)
fuzz: elapsed: 30s, execs: 2202616 (68733/sec), new interesting: 1 (total: 14)
fuzz: elapsed: 30s, execs: 2202616 (0/sec), new interesting: 1 (total: 14)
PASS
ok      fibonacci   30.918s
We can see here that the test has been run continuously for 30 seconds, as specified by -fuzztime=30s, and using 12 concurrent workers to hammer the test. It’s nice to see there were no failures, but what does the rest of that output mean?
Well, a lot of it is just telling us how many executions of the test we’re getting through every second, but that new interesting message is — well — quite interesting. It turns out that fuzz testing doesn’t just generate values on-the-fly from the seed values you give it initially, it also maintains a running corpus of generated values. It stores this in $GOCACHE/fuzz.
When I went to look in there, under an appropriate series of subdirectories corresponding to the test I’m running, I found a series of files with names that are fairly clearly the hex representation of 64-bit values and each one had a form that looked like this.
go test fuzz v1
uint32(42)
The first line is some sort of version string, and it looks like the remaining lines contain one input value each — since our function here only has a single input, there’s only one line.
There were 9 files, and along with the 5 seed cases we added with testing.F.Add() in the fuzz test itself, that’s where the total: 14 comes from in the output above. So the new interesting must indicate how many new “interesting” cases have been added to the generated corpus over this run.
I’d like to drill into how the mutator is implemented in more detail, but I think that’s a little outside the scope of what is already quite a wide-ranging article so I’ll leave it there for now. If you want to know more you can check out the fuzzing tutorial and the reference documentation in the official documentation.
Code coverage analysis is built in, you just need to run the tests with the -cover argument, which can also be used with go build. This collects code coverage metrics and displays a summary of coverage.
$ go test -cover .
ok      fibonacci   0.235s  coverage: 100.0% of statements
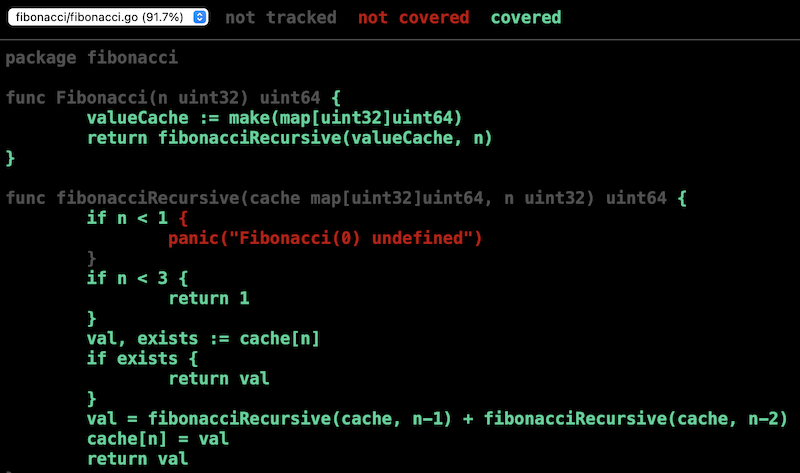
More useful for investigating coverage, however, is -coverprofile where you can specify an output path to record code coverage metrics. Then you can use go tool cover -html to generate a HTML report indicating which lines were covered — this pops open immediately in your browser, so I’ve included a screenshot below to illustrate.
$ go test -run='thValue$' -coverprofile=/tmp/coverage.out
PASS
    fibonacci   coverage: 91.7% of statements
ok      fibonacci   0.219s
$ go tool cover -html=/tmp/coverage.out
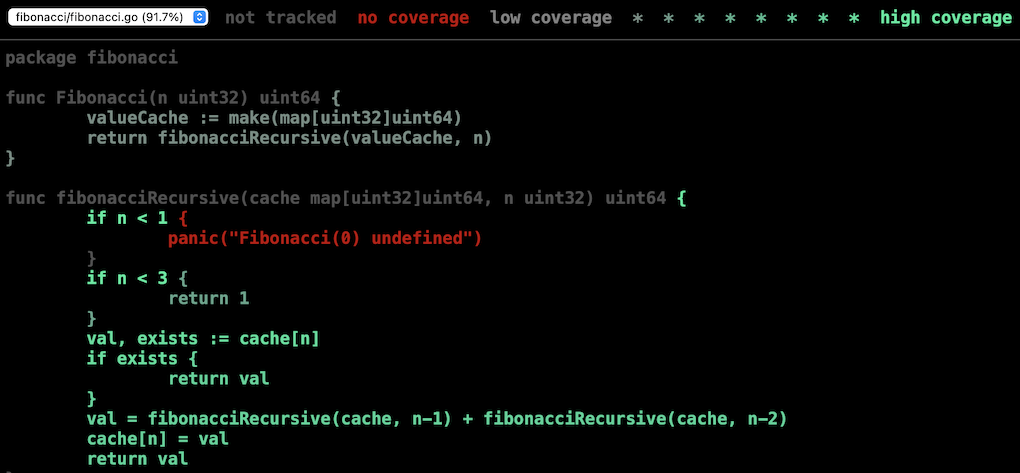
If you add -covermode=count when running the tests, you can also get an indication of how many times each line was hit using a shade of green.
Now let’s look at some of the things you might want to do between getting your code working, and committing it for a code review.
I’ve already mentioned gofmt for formatting your code. Unlike some other languages, use of this tool to ensure consistent formatting seems strongly expected among the Go community — the principle appears to be that a universally consistent style is more important than any particular aspects of the style.
Coding style discussions among a sufficiently sizeable community are always a source of friction, so I’m sure that some people will take issue with the style that gofmt uses. For example, it uses both tabs and spaces for laying out code, although initial indents always seem to be tabs so you could probably change your editor’s tab width without the code looking too weird. It also doesn’t impose any line length limit. The tool also (intentionally) offers no way to customise its output, on the basis that to do so would invalidate the goal of a community-side coding style.
However, it’s hard to argue with the fact that allowing an automated tool to handle all of your visual code layout decisions takes some trivial decisions off your hands and lets you focus on what the code does. One of the Go proverbs is:
Gofmt’s style is no one’s favorite, yet gofmt is everyone’s favorite.
The final point to mention here is that go fmt is a handy shortcut for running gofmt on entire packages. One thing to be aware of is that it runs gofmt with -w to update files in-place, so this isn’t a command to run if you have concerns about it destroying your local edits. I’m not commenting on whether that’s likely, or even possible, I’m just saying it’s something to keep in mind.
Another useful tool to check for possible problems is go vet, which will use some heuristics to try to detect potential problems. Examples of issues that it can find are:
fmt.Printf() format string and arguments.For the full list, you can see the official documentation, or you can run go tool vet help which includes the list in its output.
Before committing anything to the repository, it’s nice to make sure that your list of dependencies is up to date. There are two handy commands to help with this:
go mod tidygo.mod, and also make sure that dependencies for all operating systems and architectures are included, not just the one you’re using locally. This isn’t strictly necessary since Go fetches dependencies as needed, but it does mean each commit will include changes to dependencies to make it easier to trace which change caused them to be introduced. This could be particularly important if you’re writing code commercially and you need to do additional legal review of any library you include to make sure its licence is acceptable.go mod verifyTo compile an executable, you use go build, and can specify a directory as with go run. You can also specify an output file with -o=<path>. I say “compile”, but strictly I mean “compile and link” — as with most modern language tooling, developers don’t typically need to be particularly aware of the distinction between these, however.
As already mentioned the results of any builds are stored in the build cache, specified by GOCACHE. This is straightforward enough, and you can always clean up the entire cache with go clean -cache if you need to, or just pass -a to go build to force it to bypass the cache and rebuild all sources.
However, if you’re building applications which call into C code with cgo then you should be aware that changing the C source files will not invalidate the build cache for Go source files that use those libraries. A full discussion of cgo is outside the scope of these articles, because I think it’s a bit of a niche area, but the dependency issue could be a tricky one to track down so I wanted to call it out here.
If you want to build for a different platform than the compiler is running on, you can just set two environment variables to specify this:
GOOSwindows, linux, openbsd, netbsd, freebsd, ios and android.GOARCHamd64, 386, arm, arm64, mips64 and riskv64.Not all combinations of architecture and operating system may be supported — for the full list of supported options in your system, run go tool dist list.
One interesting option I noticed was js/wasm, which generates WebAssembly executable code. I keep meaning to look into WebAssembly, so maybe this is a good option to start with — a topic for a future article, perhaps!
When calling go build, the -gcflags option can be used to pass flags directly to the compiler. For example, passing -m displays information about optimisation decisions.
$ go build -gcflags="-m"
# fibonacci
./fibonacci.go:3:6: can inline Fibonacci
./fibonacci.go:8:25: cache does not escape
./fibonacci.go:10:9: "Fibonacci(0) undefined" escapes to heap
./fibonacci.go:4:20: make(map[uint32]uint64) does not escape
Other examples include the ever-popular -S to display assembly language output, -N to disable optimisations and -l to disable inlining, for easier debugging. You can get a complete list of flags by running go tool compile -help.
Many developers will rarely need any of these options, but it’s always useful to remember they’re there for the few times they become important.
One thing that’s not immediately obvious is that this approach only passes the flags to the compiler invocations used to build the immediate packages you specify on the go build command-line — any other required packages will get the default options. To apply the options to every package built, you can specify all= as in -gcflags="all=-N -l".
This use of all can actually be any pattern which matches one or more packages. I’m not going to go into the full pattern syntax here, but you can read by running go help packages.
As well as -gcflags to pass flags to the compiler, there’s also -ldflags to pass flags to the linker. As with gc tool compile -help above to list compiler flags, you can list linker flags with gc tool link -help.
One useful option is -X which can be used to set an initial value for an otherwise uninitialised value within your code. As an example of this, consider the code below.
1 2 3 4 5 6 7 8 9 | |
If we compile and run this as normal, unsurprisingly commit is an empty string.
$ go build .
$ ./version
Commit ID:
But if we use -X main.commit we can assign an initial value to the commit variable at link time.
$ go build -ldflags "-X main.commit='$(git rev-parse HEAD)'" .
$ ./version
Commit ID: '11756751619ae1e9e8cf8ca3ad430a9fe1b3378b'
Another option is to minimise binary size by using -s to strip the symbol table and -w to disable generating DWARF source-level debugging information.
$ go build .
$ stat -f "%z bytes" version
1967024 bytes
$ go build -ldflags="-s -w" .
$ stat -f "%z bytes" version
1422256 bytes
Once your code is written, tested and built then you can release it — but as we all know, that’s not the end of the story. There are other things you’d like to do with it, such as:
We’ll look at how Go’s tooling helps with these in the following sections.
Earlier in the article we looked at writing some benchmarks for our clunky Fibonacci() function. We can run these benchmarks with go test -bench=n.
$ go test -bench=.
goos: darwin
goarch: amd64
pkg: fibonacci
cpu: Intel(R) Core(TM) i7-9750H CPU @ 2.60GHz
BenchmarkFib1-12        216162021            5.495 ns/op
BenchmarkFib2-12        217859455            5.460 ns/op
BenchmarkFib3-12        68531080            17.05 ns/op
BenchmarkFib4-12        37475971            31.62 ns/op
BenchmarkFib5-12        23911753            49.83 ns/op
BenchmarkFib10-12        7229094           164.1 ns/op
BenchmarkFib20-12         929451          1106 ns/op
BenchmarkFib40-12         367968          2891 ns/op
BenchmarkFib80-12         189150          6332 ns/op
PASS
ok      fibonacci   12.338s
One thing that’s not immediately obvious from this output is that even though we specified -bench this doesn’t stop the other test cases from running — your benchmarks are run in addition. You could add a pattern that doesn’t match any tests, like -run=^$, if you don’t like this.
That said, what’s happened here is that each benchmark has been repeatedly run with different iterations until the benchmark takes more than a second to run. The two values after the benchmark indicate the number of iterations which the benchmark framework settled on, and the time in nanoseconds that each loop around the benchmark took.
We can see that our two base cases (with arguments 1 and 2) took nearly identical time, which is reassuring, and then the calls get slower as the input gets larger until Fibonacci(80) is taking 6332ns.
There are a number of additional options you can specify to control the benchmarking process — some of the more useful ones are:
-benchmem also shows memory allocations per iteration.-benchtime=3s changes the threshold time for benchmarks to run to 3 seconds.-benchtime=500x runs each benchmark for exactly 500 iterations.-count=3 repeats each benchmark 3 times.-cpu=1,4,8 repeats each benchmark with GOMAXPROCS at 1, 4 and 8.There are some gotchas with benchmarking, such as making sure your system isn’t scaling CPU speed for power saving or temperature limitation, and also making sure the compiler doesn’t optimise away some of the code you’re trying to benchmark. However, these issues apply across languages, so it’s outside the scope of this article to go through those in any detail.
These benchmarking facilities are simple but effective, and it’s nice to see that it’s going to be easy to include benchmarks in test suites so that performance regressions can be detected early in the development process.
As with all major languages, Go has support for profiling your application to find which parts of the code are having the most impact on performance.
It’s possible to activate this profiling at runtime using the runtime/pprof library, and this is the option you’ll need to go with if you want to profile an executable. Since this is a section on tooling I’m just going to focus on doing it for tests and benchmarks, which you can do from the command-line.
There are four types of profiling:
To generate each of these profiles you use a different command-line option to go test — multiple options can be specified to generate multiple profiles from a single run.
| Profile type | Flag |
|---|---|
| CPU | -cpuprofile |
| Memory | -memprofile |
| Blocking | -blockprofile |
| Mutex | -mutexprofile |
To illustrate how this is used, I’ll show an example of just CPU profiling. Here’s the code I’m going to use, a very simplistic implementation of the Sieve of Eratosthenes for finding prime numbers.
1 2 3 4 5 6 7 8 9 10 11 12 13 14 15 16 17 18 19 20 | |
I wrote some test cases that exercise this function up to limits of ten, one thousand, one million and one hundred million, and then I ran these cases gathering profiling data, as follows.
$ go test -cpuprofile=/tmp/cpuprofile.out .
ok      help/src/github/Cartroo/code-playground/go/basic-learning/profdemo  1.750s
One important thing to note here is that the profiler requires both the profile data generated and also the binary which generated it, so when you run go test with profiling enabled then it leaves the binary used in place — in this example it was profdemo.test.
You can run go tool pprof <binary> <profile output> to run an interactive mode of the profiler, or you can provide parameters such as -top to show the top N most expensive functions, such as in the output below which I’ve truncated for readability.
$ go tool pprof -top profdemo.test /tmp/cpuprofile.out
File: profdemo.test
Type: cpu
Time: Jul 4, 2023 at 7:31pm (BST)
Duration: 1.61s, Total samples = 1.39s (86.15%)
Showing nodes accounting for 1.39s, 100% of 1.39s total
      flat  flat%   sum%        cum   cum%
     1.12s 80.58% 80.58%      1.13s 81.29%  …/profdemo.strikeOut (inline)
     0.06s  4.32% 84.89%      1.33s 95.68%  …/profdemo.FindPrimes (inline)
     0.06s  4.32% 89.21%      0.06s  4.32%  runtime.memmove
     0.04s  2.88% 92.09%      0.04s  2.88%  runtime.asyncPreempt
     0.02s  1.44% 93.53%      0.02s  1.44%  runtime.deductSweepCredit
     0.02s  1.44% 94.96%      0.02s  1.44%  runtime.madvise
     0.02s  1.44% 96.40%      0.02s  1.44%  runtime.usleep
…
There are a lot of these sorts of options, including changing the granularity (i.e. functions, source lines, etc.), so check out the documentation for full details. However, the other thing I’d call your attention to is that you can also run the command with something like -http 127.0.0.1:5000 to spin up a HTTP server on port 5000 and open it in your web browser. This displays an interactive graphical interface showing the call graph, annotated source code, and a series of other views. See the screenshot below for an example of the call graph.
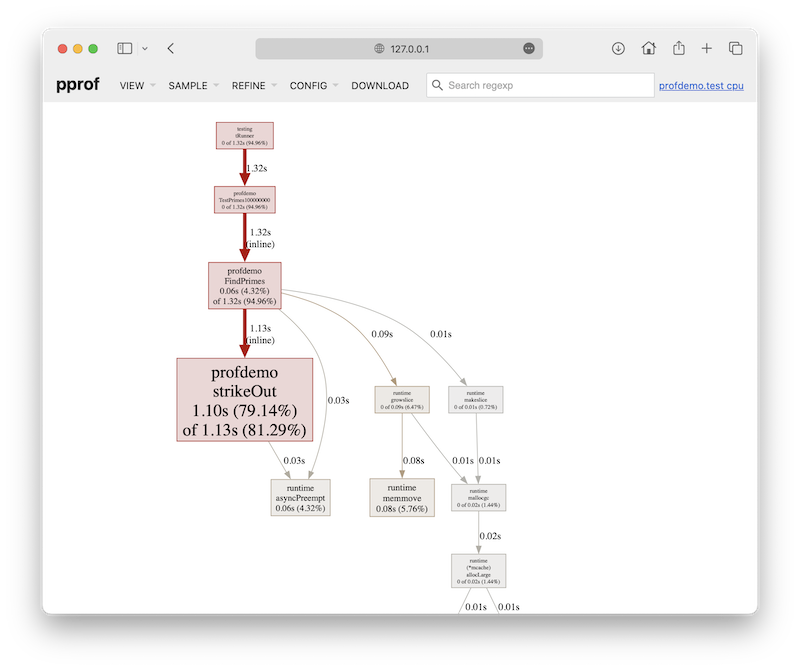
There’s a lot I’ve left unsaid in this section, as I just wanted to offer a flavour of the profiling options on offer — I’m sure that I could probably write one or possibly even more articles on the topic, but this one’s already long enough. Suffice to say the tooling looks really quite handy, and I’m looking forward to exploring this with a more substantial code base to see how effective it is.
One minor point to note, however, is that you’ll need to install the Graphviz package to make full use of this graphical mode.
Another common task you’ll need to carry out is checking your dependencies for updated versions.
We saw earlier how go list -m all lists all the modules your project requires — if you add the -u option to this, you can see which ones also have a later version available to which you could upgrade.
$ go list -u -m all
github.com/sourcegraph/sourcegraph
bazil.org/fuse v0.0.0-20200407214033-5883e5a4b512 [v0.0.0-20230120002735-62a210ff1fd5]
bitbucket.org/creachadair/shell v0.0.7
cloud.google.com/go v0.109.0 [v0.110.3]
cloud.google.com/go/accessapproval v1.5.0 [v1.7.1]
cloud.google.com/go/accesscontextmanager v1.4.0 [v1.8.1]
cloud.google.com/go/aiplatform v1.27.0 [v1.45.0]
cloud.google.com/go/analytics v0.12.0 [v0.21.2]
…
The versions in square brackets show the latest versions.
To actually upgrade them, just use the go get command that we saw earlier and specify the new version specifically. Note that dependencies of dependencies will use whatever version is specified in the go.mod file, unless you use -u flag with go get, which specifies to use the latest released version within the same major version number.
go get cloud.google.com/go@v0.110.3
After you’ve changed your dependencies, it’s probably a good idea to clean up anything that’s no longer required, and re-run all your tests to make sure nothing has been broken by the changes.
go mod tidy
go test all
It’s been an interesting tour of the Go source structure and tooling, and there’s a lot to like about it. When I first had a brief play with Go years ago it was still necessary to keep all your Go source code under a single root directory, and I’m not sure that modules were defined with go.mod files either.
Certainly things seem a lot more straightforward now than my hazy memories of back then — the structure of repositories is more constrained by convention than code, and things generally seem flexible enough to fit almost any use-case.
As with Rust, the unit tests are embedded within the package they’re testing, which is a practice that I’m still not sure I’m entirely a fan of, but I can live with it. The clear naming convention of the files is at least something that helps keep things distinct. Other than that, the testing facilities seem reasonable but extremely basic — I think an important early step within a large project will be deciding which additional module(s) to ue for testing.
Where I was impressed was the extent of the inclusive support for diagnostic tools — the ease with which it’s possible to perform code coverage checks, static code analysis and profiling are commendable. The web UI support for analysing profiling data looks to make this sort of analysis particularly accessible for people.
That wraps it up for this article — as usual, I hope this has been interesting and/or useful. I haven’t yet decided if I’m going to add any more articles in this series, since I suspect I’ve covered most of what I feel to be the subtle or important aspects of the language. There are certainly more features to discuss, but most of them seem pretty straightforward. In any case, until my next article, have a great day!
Brevity of commonly used variable names seems a common trait in the Go community, and single-letter variables are common. I’ve tried to stick to this convention in my code examples, but I’m not sure I entirely like it. In my opinion code is read far more often than it’s written, and more descriptive variable names can help a lot with comprehension. Still, in cases like this which are strongly idiomatic and commonly used, I don’t think it’s anything more than a minor niggle. ↩